Here for a Hop or GIVEAWAY??? Use these QUICK LINKS to find the right spot fast!! :)

Subscribe via email

Enter your email address:

Delivered by FeedBurner

Monday, January 24, 2011

Two Projects, One Post -- Lots of Flowers and A Princess Layout!! (M.A.G. Challenge, Paper Cutz Challenge, Cooking With Cricut, Made By Momo Challenge, My Creative Time Challenge)

This weekend I got to hang out with my BFF, Christi...  We spent all day Saturday and Sunday doing what we love to do best...  Watching all the Twilight movies, cheering for the Pittsburgh Steelers (Stairway to Seven!!), and SCRAPBOOKING!!  I was able to finish these two very fun projects for a few challenges...
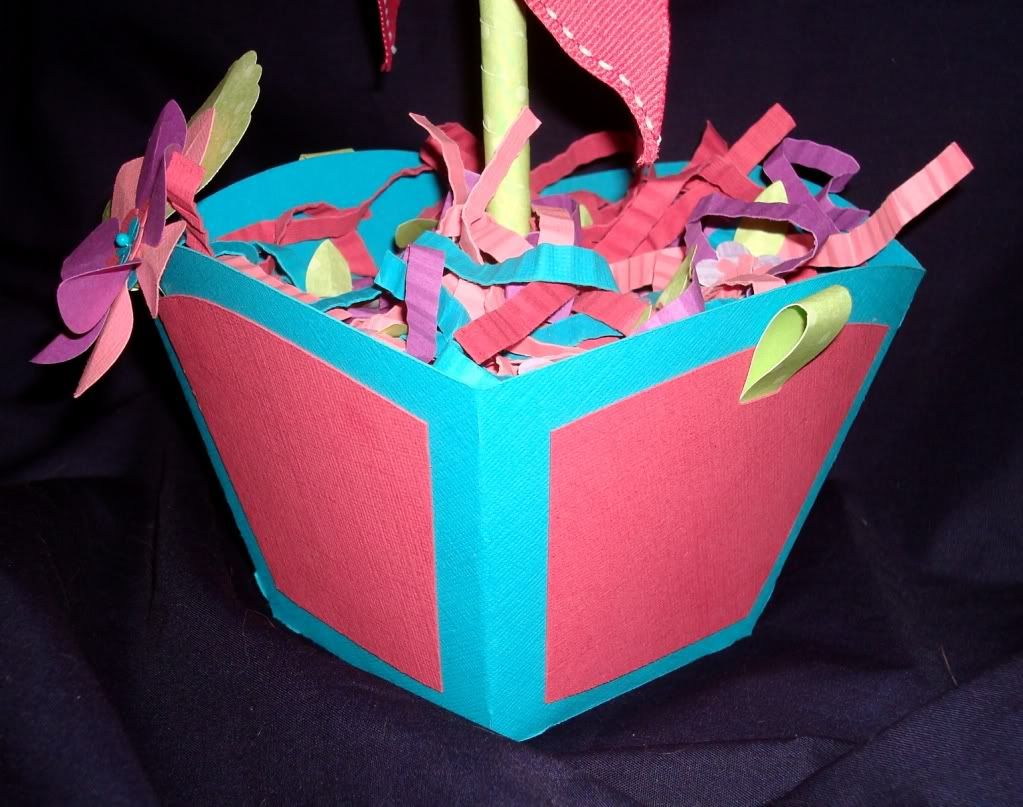
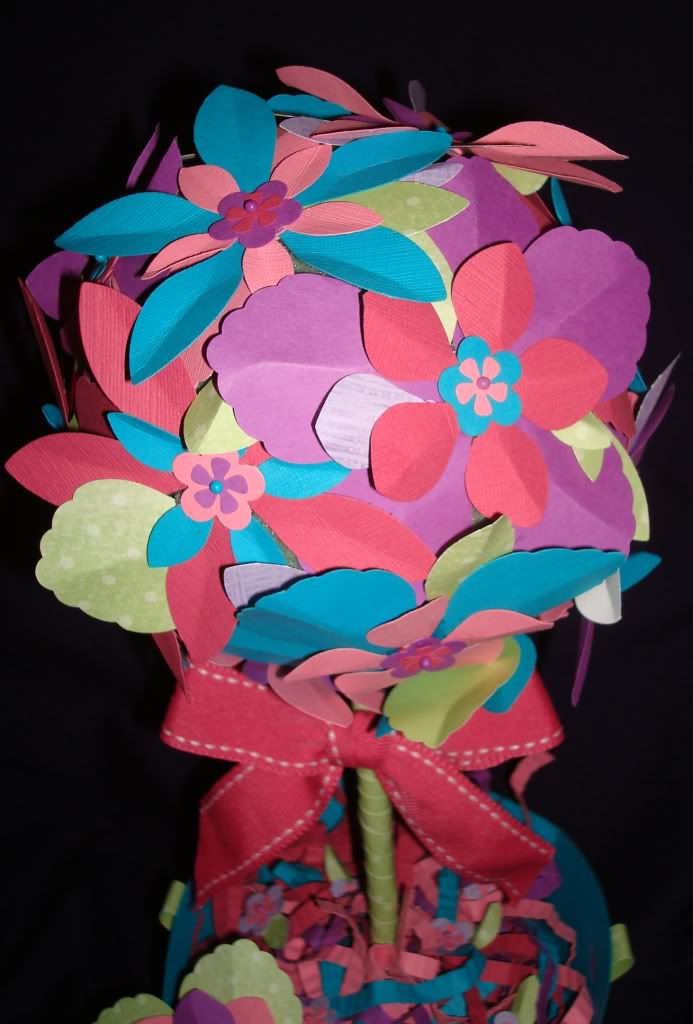
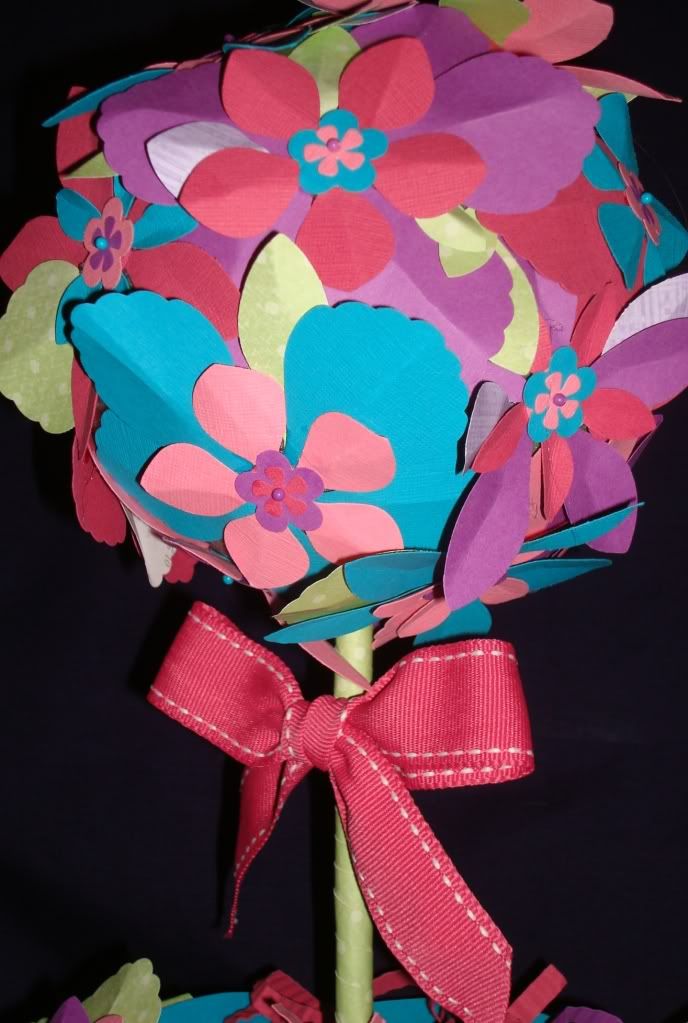
I'll start with the Flower Topiary...  I completed this project for the M.A.G Challenge By The Page, Challenge #11 AND the Paper Cutz Challenge #75...
Over at M.A.G. Challenge By The Page, they have a weekly challenge that features ONE specific page from ONE specific cartridge -- The twist is that you cannot use ANY cuts from ANY other page or cartridge to complete your project -- This twist makes it SO MUCH FUN (even if it does get a little difficult).  You can use any other embellishments as long as you don't cut anything else with your Cricut.  Well, as soon as I saw that we were using page 130 from Tags, Bags, Boxes and More, I just KNEW that I wanted to create a Flower Topiary with that little nut cup!!
At Paper Cutz Challenge, it was a Viewer's Choice challenge this week...  Any project, any theme, any colors...  And I'm always tickled when I can make one project for two challenges. :)

I had planned to punch ALL of the flowers with my little tiny flower punches from Creative Memories (see those two tiny little flowers in the center of all the other ones???)...  Well, thank goodness for BFFs, cuz Christi insisted that I'd have bruised fingers if I tried to punch one million flowers that way...  And she loaned me her VERY COOL new Stampin Up! Blossom Petals XL Punch which allowed me to piece ALL of the flowers for my topiary!!
I used a Styrofoam ball for the topiary top and pinned all of the flowers randomly to the ball...  I think the pins might have been too thin (they are regular straight pins from the sewing department -- they just have pretty colors on the pinheads!), so I went back and hot glued all of the flowers down...  So the pins are mostly decorative, but I like 'em!!
I also used a Styrofoam square in the base of the topiary...  I then cut some 1/4" strips of paper and ran them through my paper crimper to fill the base...  I added some of those little mini flower punches -- I pinned them into the Styrofoam to help 'control' the paper strips.  The final touch was the ribbon (also from Stampin Up!)...  If you would like any more details on how to create a topiary like this one, please leave me a message and I will do my best to help!!
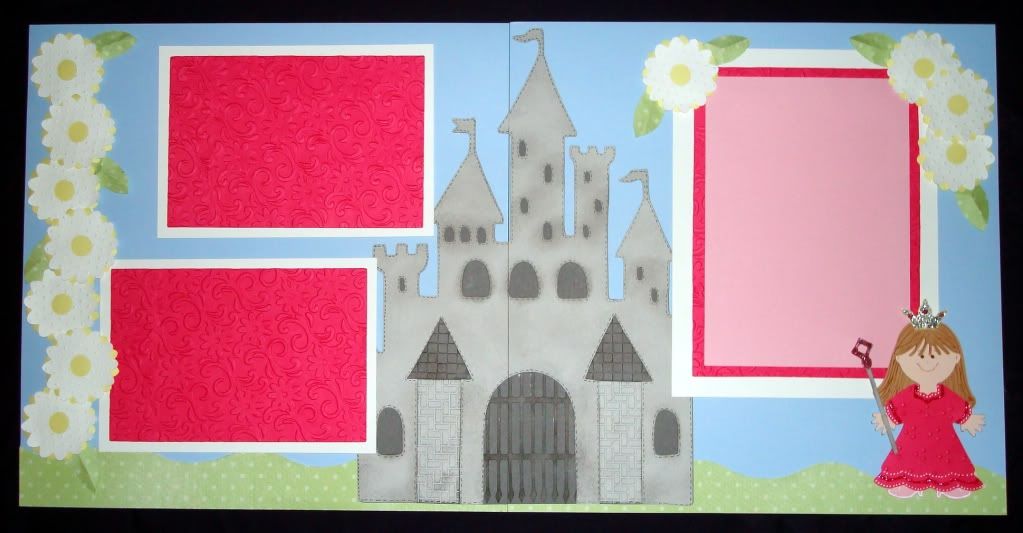
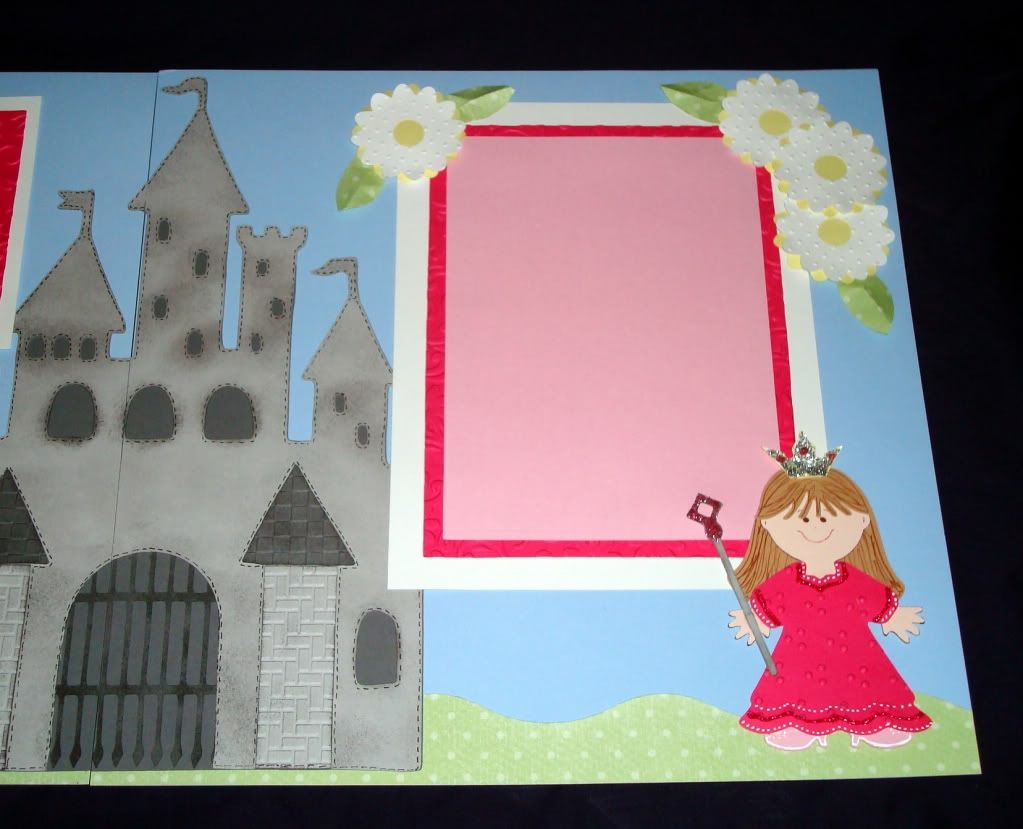
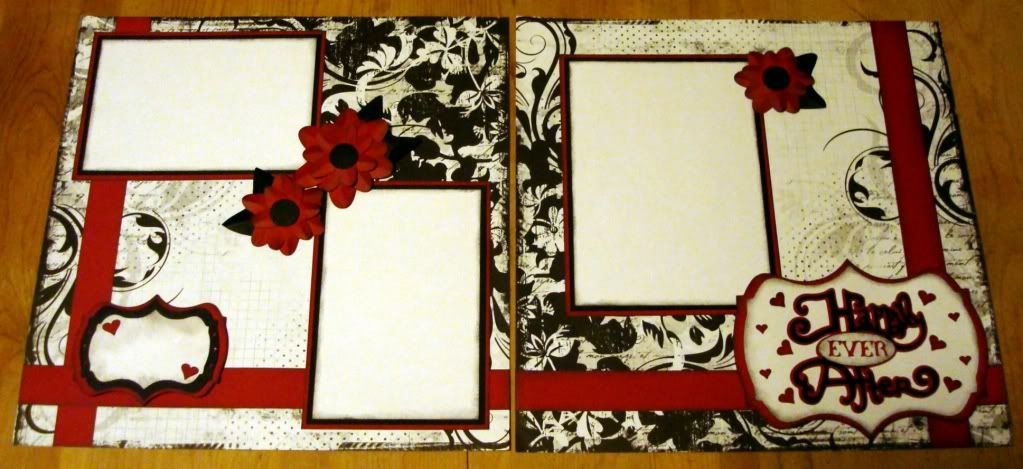
Now onto the Princess layout...  This is a two-page 12x12 page layout that I created for THREE more challenges:  My Creative Time's Throwback Thursday Challenge ~ Episode 157 , Cooking With Cricut - Challenge #13- 3 Flowers,  AND Made By Momo Tuesday Challenge (on Wednesday!)...
At My Creative Time, Emma asked participants to create a project using either the Paper Doll Dress Up Cartridge or the Everyday Paper Dolls Cartridge (I actually used both) AND some form of embossing...  Momo asked participants to create a project with a Princess theme...  and Cooking With Cricut asked participants to use at least 3 flowers cut with the Cricut (mine are from Daisy Chain)...

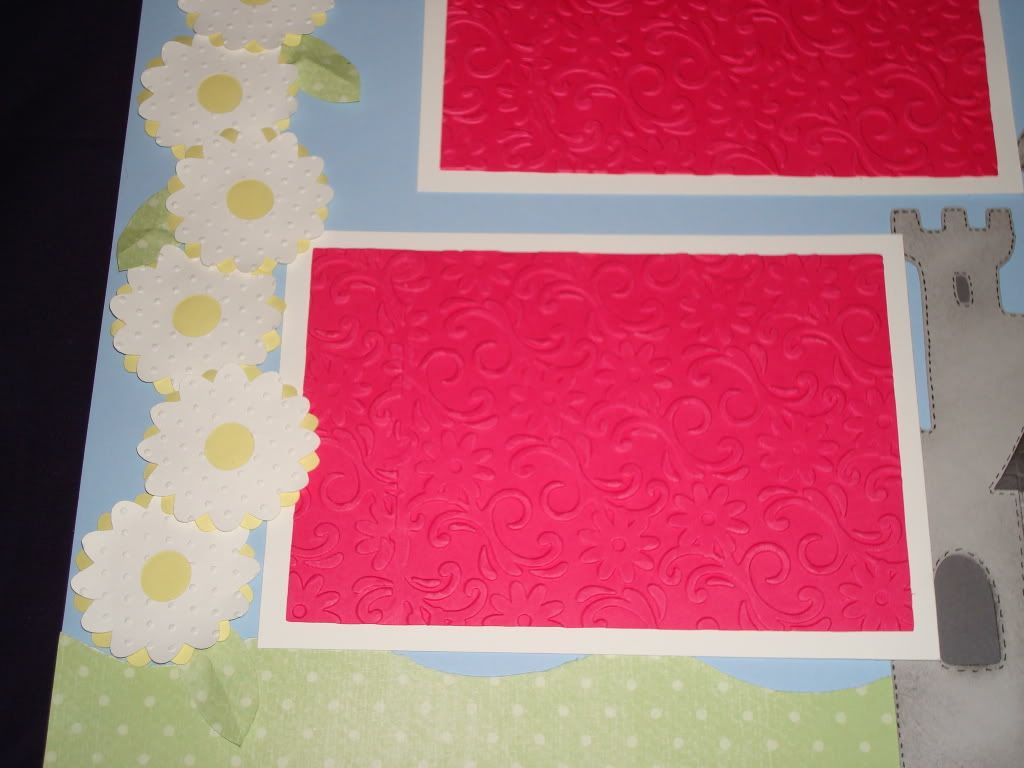
My original intention was to follow the sketch at Cooking With Cricut, but I wanted to use this layout for some of The-Girl-Child's pictures from when she was little, and I just couldn't make the sketch work for it -- Instead, I settled for frames for two 4x6 photos on the left page and one 5x7 photo on the right page...
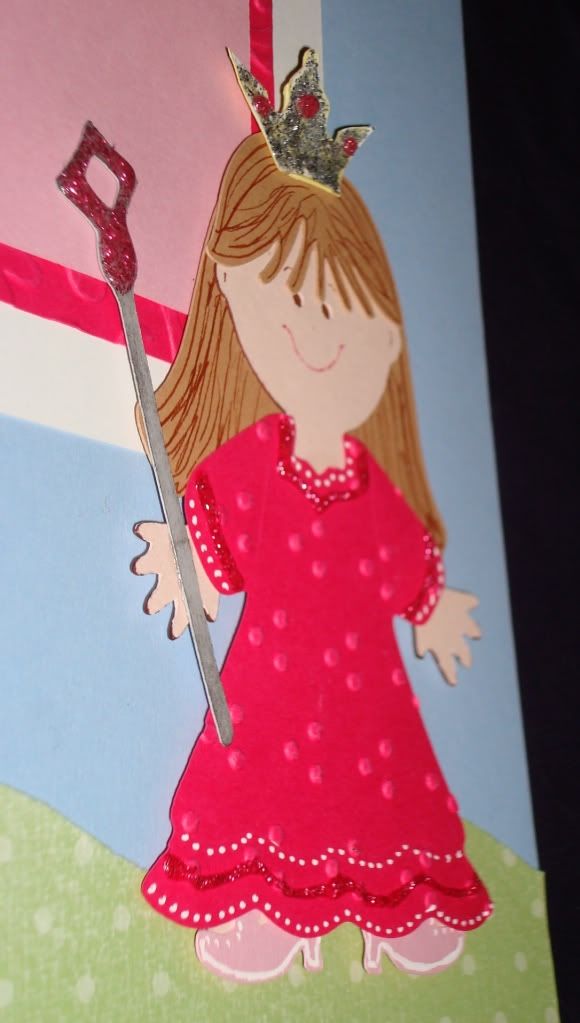
The entire paper doll as well as the castle can be found in Paper Doll Dress Up...  (I'll be featuring a Cartridge Exploration Class for this cartridge at my upcoming Winter Scrapbooking Retreat in Western Pennsylvania, so if you're in the area, you can find all the details HERE...).
 I used my Gypsy to create a blackout cut (hide contour) for the castle and used black ink and a sponge to distress the coloring...  I also hand cut the columns from the castle so I could emboss them (with Cuttlebug's Checkerboard and Bricks)...  Some silver and dark pink Stickles added some glitz to the tiara and scepter for my little princess. :)
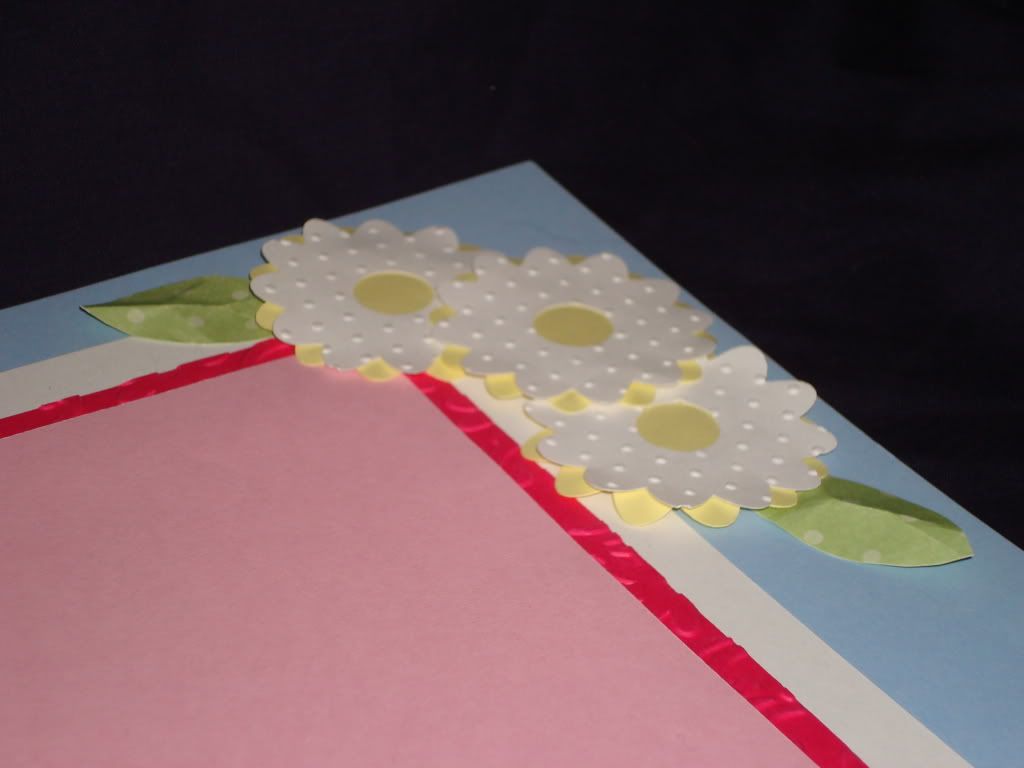
These simple flowers can be found on the Daisy Chain Cartridge...  I used my Gypsy to cut the yellow flowers by using the 'hide contour' feature -- This allowed me to create a blackout for the flower too.  Curling the edges of the flowers and embossing them with my Cuttlebug Swiss Dots folder adds dimension (and I L-O-V-E dimensional flowers!).
I used Sizzix's Floral Flourishes embossing folder for the raspberry/dark pink photo mats to add balance to the layout... 

I hope you enjoy my Princess layout!!  Please be sure to leave a comment and let me know you were here...  I'd also love for you to become a follower, if you're not already...  Let me know if you sign up to follow -- I'd love to see what you're creating too!!

To see all of my current creations, please CLICK HERE!

Thursday, January 20, 2011

Death By Chocolate -- Is it Friday yet?

Wow.  What a day...  Is it Friday yet?  Can we officially claim the week as o-v-e-r???  This is a gift bag that is *supposed* to be full of chocolate...  Lemme go over the details of the project first, and then I'll enthrall you with why it's not full of chocolate at the moment (beside the fact that I probably would have EATEN the whole bag after this week so far....)
I created this project for several challenges (it's the first time I've combined more than two challenges, so I hope that's okay!!):
PaperCutz Challenge - Project using a tag (any color/theme)
Flaunt It Fridays - Project using the skull image from Mini Monsters (non-Halloween)
Jitterbuggin Challenge - Creations out of brown & one other color
My Creative Time (Imagine Nation) - Sweet/Valentine Challenge (thankfully, the project doesn't have to be created with an Imagine...  as I do not have one...  But I'm ecstatic to get to use my Expression instead!!)
Fantabulous Cricut - Sweet Shop
Please be sure to visit these fabulous sites to see the other creative projects crafty people came up with!!
To create my oversized tag, I cut a strip of brown cardstock to measure 4"x12"...  I then cut the left side of the tag by hand to make it look...  well, like a tag!!  I used a circle punch to cut the hole in the end of the tag and then adhered my embellishments...
The skull was cut from the Mini Monsters Cartridge (again, using this cartridge for something other than Halloween!!  YAY!!).
The words "Death by" were cut at 1.5" and is the Vampire Font on Happy Hauntings .....  what??? I have MORE THAN ONE Halloween cartridge???  And I'm using BOTH for non-Halloween items???  Wow...  The word 'CHOCOLATE' was cut with the Opposites Attract Cartridge...  I added some dots with my white Signo pen...
My hearts are punched with my Creative Memories Heart Shape Makers (large and small)...  To finish off the project, I added a covering to the one and only candy bar that I could find tonight...  I had to *borrow* it from The-Girl-Child -- who saw me borrowing it and generously offered to share it with me -- until I informed her that she couldn't EAT it tonight!!  {grin}...
And now, all I have to do is fill this bag up with chocolate and present it to someone who *really* needs chocolate as much as I do right now!!

So...  Why isn't the bag filled with chocolate???  Well, my original plan was to stop at Wally-World after I dropped The-Girl-Child off for the away basketball game she was off to cheer for...  But...  Well, there were other plans for us that involved a car over the center line, icy roads, a snowy ditch, and, um...  oh, yeah...  that tree.  Thank Jesus we are safe, and (as my mom said) cars can be fixed...  And leave it to The-Girl-Child to hug me after we returned home and remind me that 'it coulda been worse!'  Wise women from the generation before and the generation to follow  :)  We were only a half mile from home, kind people stopped to check on us, and my husband and father-in-law pulled us out of that ditch.  As for me...  Well, I'm ready to curl up with a bag full of chocolate and wait til Winter goes away!!  (Guess I should also be thankful that I didn't get to Wally-World to buy that chocolate first!!  Ha ha!!).

If you live or visit the Western Pennsylvania area, I'd love to have you join us at one of our Scrapbooking Retreat Weekends!!  We have one coming up in just a few weeks with only a few spots still available...  You can read all about it HERE!!  Or...  If you'd like to see all of my current creations, please CLICK HERE!

Blessings to each of you -- May your journeys all be safe and snow-free!!

Please leave a comment to let me know you were here...  And if YOU need chocolate this week, feel free to tell me why (or simply that you do)...  Maybe I'll have a drawing for some *REAL* candy!!  :)

Wednesday, January 19, 2011

I {Heart} My Mummy -- Cricut Cartridge Chaos Challenge (Mini Monsters)

Ah-ha!!  I have accepted the challenge to use my Mini Monsters Cartridge for more than just Halloween!!
I somehow found my way to another Challenge this week...  Paula at More Than Favors and Meriah at Two Scraptastic Gals are co-hosting a Cricut Cartridge Chaos Challenge (say that 3 times fast!!) each week, and this week is Challenge #2 - Mini Monsters...  Ya get to VOTE on what cartridge they are featuring for the next week, so it gives you a little time to think ahead about what you might want to do...  Last week I voted for Mini Monsters...  Before I actually thought about the fact that when I got it I thought it was filled with mostly Halloween images (remember, I'm *not* the Halloween person, so what was I thinking when I got this one??? -- As it's turned out, I've used this cartridge for anything *BUT* Halloween...  Remember THIS one?)....  Anywho...  When Mini Monsters won for the week, I'd already decided I'd be making a Valentine card for my Mummy!!  :)
I used a black card base that measures 4x6 ~~ yeah, I'm one of those rebel card makers who doesn't subscribe to the A2 philosophy :) ~~ Hey!  This size fits in those generic invitation envelopes that Wally-World sells...  My mummy is cut with all layers: Base Shadow feature in raspberry, body/legs/arms (Main feature) in purple, body (Layer 1) in red, wrap (Layer 1-shift) in pink (distressed with a little SU! Real Red), eyes (Layer 2) in white, and eyes/mouth (Layer 2-shift) in black...  All pieces are cut at 3.5"...  I cut the phrase in both raspberry and purple to create a shadow effect (I haven't quite figured out why the phrase is over or behind the character by default yet...), BUT I didn't want it to say 'I Want My Mummy' so I cut out the 'Want' and replaced it with the {Heart} instead...
I added a pink rectangle (measuring 3.5"x5.5") to the inside of the card (after I distressed the edges with Stampin Up! Real Red ink) as well as a red heart...  A white Signo pen was the perfect way to add a whole lot of white dots and doodling around the letters, and I finished the card off with some raspberry twine...  My little mummy is popped off the page (even though I couldn't get the picture to show that) with some plain old FunFoam on the back.
I hope my Mummy {hearts} my card :)  and I hope YOU {heart} it too!!  Please leave me a comment and let me know!!
Thanks for stopping by, and please come by again soon...  To see all of my current creations, please CLICK HERE!

Happily Ever After Wedding 12x12 Layout (Double Page Spread) -- M.A.G. Challenge, My Creative Time Challenge

Last fall I told myself that I really wanted to start using some of my Cricut Cartridges that I rarely get to use for one reason or another (We all have our favorites, right?  You know, the cartridge that we use over and over for every project we tackle?)...  So I was happy to create this double page layout using ONLY page 69 from the Storybook Cartridge (my first time using it!)!!  I am entering this 12x12 (or is 12x24???) page layout into TWO challenges:  The M.A.G Challenge By The Page (Challenge #10) and Emma's Throwback Thursday Challenge over at My Creative Time...

M.A.G. Challenge By The Page is a newer challenge site that was started by three very talented ladies...  I actually found it through another blogger, Melissa a.k.a. Moe Creations...  She's on the Design Team for Cricut Cardz, and she is always kind enough to leave me a lovely comment on each and every entry I do...  I think their challenge blog has a really neat concept -- You can ONLY use the Cricut to cut the images from ONE specific page from ONE specific cartridge each week (they announce which one each Friday)...  This REALLY is a challenge!!  It's really hard to put your Cricut away after cutting only the images from that one page (it means you can't use the font from another cartridge or any other cuts from any other pages/cartridges!!).  This week, the challenge was to use ONLY page 69 from the Storybook Cartridge.  Not only did I use the 'Happily Ever After' image, but I also used the Accent Frames feature and the Accent Blackout feature.

Additionally, I created these flowers by cutting lots of little ovals with the Shadow/Shift feature (these were then folded and inked to give them more dimension).  Thank goodness you can use any other embellishments that *aren't* from your Cricut -- It's really encouraged me to pull out my punches (for the hearts and the circles on the flowers) as well as going *old school* to hand-cut the leaves!!  I hope you'll visit them and maybe even try out a challenge for yourself!!
Emma at My Creative Time has a Throwback Thursday Challenge that features an *older* Cricut Cartridge.  This week it was a 'Viewer's Choice' -- any cartridge, any theme as long as it featured a HEART somewhere in the design...  I used my Creative Memories Love Struck Maker (Heart Border Punch) to punch some little, little hearts (cuz remember I couldn't cut them with my Cricut!) which I added to the accent frames...

My background paper is from the Creative Memories Black & White Power Palette Designer Paper -- This is such a versatile pack since you can add any color and either have a striking contrast or a very subtle touch of color...  If you do not have a Creative Memories consultant and would like to order any of the CM products I've used, you can have them direct shipped by clicking and shopping HERE...

I would love to read your comments on my layout, so please be sure to let me know you were here. :)  If you live or visit the Western Pennsylvania area, I'd love to have you join us at one of our Scrapbooking Retreat Weekends!!  We have one coming up in just a few weeks with only a few spots still available...  You can read all about it HERE!!  To see all of my current creations, please CLICK HERE! Thanks for stopping by -- Hope to see you here again soon!!

Tuesday, January 18, 2011

Happy Birthday Square Card - Red, Black & White Challenge + Glittermania

I'm baaaaack!!  And I'm ready to complete some challenges!!  Woot-woot!!  Have ya missed me?  :)
For my first project of 2011, I've created this super-simple square Birthday Card just loaded with my favorite crafting supply.... GLITTER!!  I am entering this card into two challenges:  The Cricut Cardz Challenge #57, which was to "make a card using any cartridges or theme you'd like, BUT using the colors red, black and white ONLY!" ...and the Cooking With Cricut Challenge #12 -- GLITTERMANIA! where they wanted to see ya glitz it up big time!!
 To create this card, I used:
Stretch Your Imagination Cricut Cartridge
Black Cardstock
White Cardstock
Red American Crafts Glitter Cardstock
Shipping Tape
Stampin Up! 'Well Scripted' Stamp Set
VersaMark Stamp Pad
Martha Stewart UltraFine Glitter
Red Embossing Glitter Powder
Embossing Heat Gun
Recipe Instructions:
  1. To create the card base, select the 'Card' feature on your Stretch Your Imagination keypad overlay.  Then select the 'Present' key and cut at 5" from black cardstock.  
  2. Leaving the size at 5", select the 'Card Frame' feature and select the 'Present' key again (or use Repeat Last).  This will cut your red glitter cardstock...  Be sure to remove your blade housing and clean any glitter from the blade area after cutting the glitter cardstock.  This will keep your blade rotating freely and avoid any paper tears on your next cut.  
  3. Cut two pieces of white cardstock each measuring 4.75" square for the inside of the card (do not adhere yet).  
  4. Open the card and tape shipping tape over the entire 'present' area (the sticky side of the tape will face out to the front of the card).  
  5. Flip the card over so you are looking at the front and sprinkle glitter generously over the visible shipping tape...  Pat gently and shake excess from card front.  
  6. Using a precision glue pen, apply glue to the bow and ribbon area of the present on the front of the card.  Sprinkle black glitter onto glue, pat gently, and shake excess off for an added sparkle effect on present area.  
  7. Adhere red glitter card frame to front of card.  
  8. Using VersaMark pad and 'happy birthday' stamp, stamp sentiment on one of the white cardstock squares.  Sprinkle red embossing glitter onto image and shake off excess.  Use heat gun to emboss image.  Adhere to right inside of card.  
  9. Adhere second white cardstock square to left inside of card (over shipping tape).

Voila!  Present to the lucky recipient!!

When The-Girl-Child came into the kitchen where I was adding the last minute touches (when I decided to emboss the 'happy birthday'), she immediately told me what a beautiful card it was!!  For a card that really took less than 15 minutes to cut out and create, I was tickled!!  :)

I'd love to hear what YOU think of my card, so please leave a comment and let me know you were here. :)

Thanks so much for stopping by!!  I hope you'll come back and see what else I'm creating in the next few days!!  To see all of my current creations, please CLICK HERE!

Friday, January 14, 2011

Wanna Win It? Winter Frolic Cricut Cartridge...

It's always GREAT fun when someone offers a FREE drawing to WIN a WONDERFUL Cricut Cartridge like Winter Frolic!!  Do ya have it yet?  If not, hop on over and visit Gigi at The Cricut Bug for details on how to WIN this cartridge  (Here's the low-down: She's trying to reach 200 followers -- I was #193, so she's not far away!!  When she reaches 200, she's drawing one lucky winner!!  Hurry up and get over there!!)... 
 
Blogging tips