Here for a Hop or GIVEAWAY??? Use these QUICK LINKS to find the right spot fast!! :)

Subscribe via email

Enter your email address:

Delivered by FeedBurner

Sunday, July 31, 2011

Getting Cricky Simply Sunday Challenge: Positive Thoughts -- Box Card Challenge Reminder!! :)


It's Simply Sunday Challenge Day over at Getting Cricky!!  This week, the challenge is to create a "Think Positive!" project!!  Most of my Design Team Sisters and I will be featuring the Positive Thoughts" Stamp Art Set from K Andrew Designs...  So get creative with a card, layout, or project with a "Think Positive" theme and join in on the fun with us!!  For a little inspiration, I created this:
This is my first attempt at making a BRAND NEW card style I just learned from my new friend Laura from Laura's Crafts and More!!  Laura just did a Guest Designer spot on my blog on Friday -- If you haven't checked out her post yet, please CLICK HERE to see it (there's even a chance to win a little goodie, so be sure to check that out too)!!
Remove the belly band on the card to reveal....
That it POPS open into a little box!!  Perfect for a little gift like a pair of earrings or a gift card or some scrapbooking embellishments!! :)
Of course, the sentiment says it all -- "Today... is your day!"  Imagine if we ALL lived each day remembering that today can be the BEST day!!  It doesn't have to be your birthday for you to embrace the moment you're in right now!! :)  Look at the sun shining outside -- That is for YOU!!  When the rain falls, that is for YOU too!!  And in the dead of winter, when the snow blankets the fields around you - muffling the sounds of traffic, that is for YOU too!!  So enjoy the beauty of today (and every day!) because...  "Today...  is YOUR day!!"

Now hop on over and enter the Simply Sunday Challenge at Getting Cricky...  We can't WAIT to see what you create!!


Would you like to create one of these FANTASTIC and FUN Box Cards???  Get all the details on how to make this card by clicking on the Love To Crop! Challenge button...  Then enter the 'Box Card Challenge' for your chance to WIN WIN WIN!! :)

Love To Crop! Challenge


Dont' forget to stop by and see Kristal's NEWEST Stamps available for PRE-ORDERS--for a limited time, you can get them at a discount and reserve yours before they sell out!!  There are THREE brand new sets -- "Coffee & Tea for You & Me" (get your Java on!!), "Sympathetic Sayings" (a super-sized set!!), and "Winged Things" (an awesome Mix-N-Match set perfect for many occasions!!)...  :)


Coffee & Tea Mix & Match 


Sympathetic Sayings (Larger set)


Winged Things: Mix & Match (Bonus frame & images)


Until next time, may all your thoughts be positive.... :)

Saturday, July 30, 2011

How Neat Is THAT?!? -- The Interactive Blog Hop... It's a Bird, it's a Birdhouse, it's a.... SURPRISE!! :)


Welcome to the "How Neat Is That?!?" Blog Hop!!

Welcome to the Interactive Hop where things either move, are hidden, pop out, slide, surprise, or who knows what else....  Our fabulous host Monica has assembled an AWESOME list of crafty ladies who are sure to leave you saying, "Hey! How neat is THAT?!?" at each stop along the way!!  Hopefully you will come away with some wonderful  and creative new ideas on how to make your cards, layouts or minis more interactive...

In addition to some really cool projects, you'll find some Blog Candy scattered here and there as well!!  Additionally, Scraps2treasure is having an overall grand prize and these are the simple rules:
  • Become a follower of each blog, and....
  • Leave a comment at every stop (yep, that's really it!!)
If you've hopped along from Celeste then you are in the right place!! If you are just joining me from your dashboard, or reading this via email, please be sure to CLICK HERE to start at the beginning with Monica's blog (because the beginning is the BEST place to START!!)...

Sooooooo...  Who's ready to see what I created for you today???  Let me tell you -- I am SO excited about this!!  Yes, it is picture heavy, but I really hope you find it to be worth the extra pictures...  :)
Who doesn't love a birdhouse, right???  Yes, this birdhouse is made completely of paper (enhanced with some ribbon and a few of my handmade stick pins)...  
The 'shingled' roof is covered with hexagon shaped pieces inked on all edges...  There's a "door" (filled with Spanish Moss) and a perch (a piece of a bamboo skewer)...
 I hand wrote the sentiment and punched the labels and leaves with two Stampin' Up! punches...  The cardstock and decorative paper is all from Stampin' Up! as well...

So...  What makes it interactive???  Let me show you by removing the "lid"....
Need to see a little more???  Perhaps the lid all the way removed???  :)
 Well, hello, little birdie!! :)  Are you nestled all snug in your new little home???  Look what happens next...
The base of the birdhouse opens into an Explosion Box!!  Perfect for adding photos of your favorite birds...  Or bird lovers!! :)
My little birdie is a hand-carved and hand-painted little beauty, and she's nestled atop some Spanish Moss and decorative twigs...
There's room to add up to 24 photos in this Explosion Box...  The decorative accents are attached to the cotton thread, not the decorative paper, so it's quick and easy to slide photos or memorabilia right behind the accents and thread!! :)
Embellishments were added to each layer of 'pages' in the box and the outside lid...  Handmade stick pins, circle flowers, punched birdies, and the "Home Tweet Home" tag...
Instead of placing a bird at the center, you could also use the explosion box for a gift card or small piece of jewelry....
I absolutely LOVE making what I call "Transformer" Explosion Boxes...  It's so exciting to see someone's face when they open one of these for the first time.  I'm constantly trying to think of new ways to design the tops of my explosion boxes...  While a basic explosion box can be completed in under an hour, this one required many extra hours to design the bird house top.  Without a pattern to follow, part of the fun for me is the challenge to pull it all together with some visual thinking.  If you would like to see two of my other "Transformer" boxes, you can see them HERE and HERE...  If you would like to have a printable copy/tutorial of my 'basic' explosion box, you can find that by clicking HERE...  If you decide to make one (a basic one OR a 'transformer' one, I'd LOVE to see it -- so be sure to come on back and leave me a link so I can check it out!!)

I'd like to give Monica a HUGE thank you for including me in this SUPER NEAT Blog Hop!!  I'd also like to thank my mom for inspiring the birdhouse idea and all of my wonderful friends and followers who are helping to make this such a FABULOUS hop!!  Now....   Before I send you off to your next stop on the hop...  What's a hop without some CANDY???  I have a *special surprise* to send out to one fabulous winner!! :) 

To be eligible for my blog candy:

  • Please become a follower of my blog and leave me a comment answering this FUN question: "If you were a bird, what kind of bird would you be?"!!
For additional entries for the candy:
  • You may 'like' my Facebook page (click HERE)...
  • Subscribe via Email by entering your email in the box above (be sure to confirm your subscription). 
  • Leave a comment on one of my other 'transformer' explosion boxes posts (you can find them HERE and HERE)  
Please leave an additional comment for each 'extra' entry you complete....  If you leave your email address (please leave it in SAFE scrapbookingwithamy at gmail dot com form), I will be happy to contact you if you are the winner; otherwise, you will need to check back after Wednesday, August 3rd to see if you are a winner.  No captcha here, so commenting is quick and easy!! :)


Thank you so much for checking out my project...  I hope you think it's as NEAT as I do!! :)   Now hop on over to Yolie's blog and remember to visit all the stops, become a follower at each blog, and leave a comment at each stop along the way in order to be eligible for Monica's GRAND PRIZE Blog Candy!!

Here's the Hop line-up, in case you get lost or want to re-visit anyone (please note that the following links will take you directly to each participants post!!):


How Neat Is That


Until next time,

Friday, July 29, 2011

Please help me welcome my Guest Designer... Laura!! And... Oh! Oh! Oh! A challenge for ya too!! :)

Happy Fabulous Friday everyone!!  Over the next few weeks, I will be featuring a few friends here -- Some are Bloggie-Land friends I've had for a while, and others are NEW friends who may have just started blogging or haven't had much recognition...  Recently, I asked the Love To Crop! Facebook Fans to leave a link to their blogs so that we could visit one another.   Laura from Laura's Crafts and More posted her link, and I fell in love with the box card on her blog and just HAD to ask her to share it with all of you!!   Laura graciously agreed...  So I would really appreciate if, after you check out her AWESOME tutorial here, you would pop over to her blog (click here) and show her some bloggie-love -- Become a follower and leave a comment!!  I'll be sending a RAK to one person who does (so be sure to tell her that you're stopping over after you saw her here, so I know who to draw from!!)...  And if you would like to be considered for a future Guest Designer spot, please leave a link to your blog in the comments on this post so I can come visit you too!! :)

And now, I give you...  Laura from Laura's Crafts and More!! :)

I am SO excited!! I feel so honored to be asked to be a guest designer! This is my 1st time but hopefully not my last! :) Let's start with a little about me...My name is Laura & I have been stamping for about 10 yrs...And then a couple of years ago I got my Cricut!! Combining stamping & Cricut has been so much fun! About 3 yrs ago, a friend asked me to make her some baby invitations & from then on I have slowly built up a small business & hope to get more customers soon!!

I have been married for almost 21 yrs to my HS sweetheart & we have 2 boys (16 & 13...Eeeekkk!! Teenage boys!!) I am a SAHM & can spend hours if not days (LOL!!) in my craft area!

Enough about me...Let's get to the fun stuff!! :) I chose to make a "box card" today. I saw this on Splitcoaststampers on the Weekly Inkling (If you do not subscribe to this...do it now!! There are some AMAZING ideas on this site!!) My Mom tried this first & told me I HAD to try it...I finally did & now I am SERIOUSLY ADDICTED to making them! (Thanks Mom!!) They are so easy! Here is the original tutorial...I HIGHLY recommend watching the video at the bottom, Trust me!! I am usually a visual person, but after an hour trying this, I almost gave up!! Then I watched the video & BAM!! Gorgeous card!!

Here is the finished card (outside view)
And here is the back...
This is great for a small note or even any flat candy (Ghiradelli choc come to mind!!) but this time I decided to use it for a gift card holder! So here is the inside...
I cut a piece of cardstock to 4x4, used my tab punch to make the tabs to hold the gift card & I used a CuttleBug border embossing folder on the bottom for some texture. And of course added some bling!! :)

Here is the finished inside...
I used all Stampin Up paper (Cottage Wall-retired)  &cardstock (Rich Razzleberry)

Well I have really enjoyed this guest spot & I hope to see some of you over on my blog!! Thank you SO much Amy!! This was a blast!! :)

Until next time...
♥ Laura ♥


WOW!!  Laura, that was GREAT!!  For those of you who would like to make one of these, we'd LOVE to see yours too!!  So add a link in the Linky-List below so we can come and check it out -- You have two weeks to enter YOUR box card for a chance to win a little something-something (I'll add a picture of the prize in just a bit)


Wednesday, July 27, 2011

Decorate To Celebrate Challenge #5 -- Neighborhood Party Theme: Pool Party Favors

Welcome to another WONDERFUL Wednesday!!  And welcome to all of my new followers and friends!!  What a treat to have you here with me today!!  :)

Today is the start of Challenge #5 at the Decorate To Celebrate!! Challenge Blog!!  The theme for this challenge is Block, BBQ, or Neighborhood Party!!  So we want to see all of your decorations and party supplies celebrating everything fantastic about summer celebrations!!  :)

For this challenge, I decided to get busy with one of my favorite K Andrew Designs Stamp Art Sets...  "Splashtastic Summer"!!  This is such an AWESOME and FUN stamp set, full of mix-and-match sentiments perfect for SO many occasions!! :)  And the BEST part about this set is that for EVERY set purchased, Kristal very generously donates at least $1 to the Autism Research Institute -- So you can feel good about helping a worthy cause every time you use this set!! :)  Woot-woot!!  Now, let's check out the projects...
When I think of a Neighborhood party...  I think POOL PARTY, so I created some FUN Pool Party-themed party favors sure to be a hit!! :)
This is a 'Favor Fan'...  And WOW does it work well!!  I will never attend another baseball game without one of these handy little items!!  I'm actually going to make some cool Pittsburgh Pirate themed ones for all of us!!  I attached this one to a tube of sunscreen and added a tag that says, "Here come the Sun"...
To create one of these, you will need TWO strips of 12"x3" cardstock and ONE strip of 12"x1.75" cardstock.  Since I punched the edge of the pink paper, I scored it at even increments according to where the punched image fell...  But normally I would just score it every 1/4".  Mountain/valley fold the entire way down the strip (on the scored markings) and attach the ends.  Then, using a strong adhesive (or glue gun), adhere the center of the fanned strips.  Repeat with the smaller strip and attach to the first rosette...  When your 'Favor Fan' is finished, use hot glue to attach a small dowel rod (I actually use bamboo skewers) to the back and let dry.  Then...  fan yourself happy!! :)
The tag is made with a smaller rosette (pink strip measure 12" long and 1" wide).  When I glued this one, I glued it into an oval shape instead of a circle.
These are water balls (thus the "Have a Ball" sentiment)...  I removed the cardboard header tag that was already on them and replaced it with this much more festive and fun topper. :)  The blue background is embossed with a Sizzix embossing folder (from the 'Summer Fun' set, I think).
Water balloon 'fights' are a must-have at a Pool Party!!  These 'treat' bags filled with 30 water balloons should keep everyone hopping and having fun!! :)
What's more fun than a bucket filled with goodies???  From sunglasses and bubbles to silly string and glow bracelets (oh yeah...  We're partying late into the night!! LOL), this bucket promises plenty o' FUN!! :)
Here's a close-up of all those AWESOME "Splashtastic Summer" stamps from K Andrew Designs!  Aren't those just the "COOLEST"???  :)

Now it's YOUR turn!!  Link up your NEW Neighborhood Block Party or BBQ Themed (or ANY Themed) party project at the Decorate To Celebrate!! Challenge Blog...


Decorate To Celebrate!


The winner(s) of the challenge are invited to be future Guest Designers AND are entered to win the Grand Prize for August -- A $40 pack of of paper, embellishments, and more!!  For more inspiration, be sure to visit the other designers' blogs:

If you would like more information about Kristal's stamp sets and the charities she is supporting, please click on the blinkie below...


Thanks so much for stopping by!!  I can't wait to see what YOU create for the challenge!!
Until next time,

A Boatload of Winners, a Mini-Giveaway Announcement, and an Invitation...

Whew!!  I did not realize how many WINNERS I would have to post today!!  Please check, double-check, and re-check this list to see if YOU or anyone you know is a WINNER (I always appreciate when you pass on this information to the winners just in case an email gets lost or they don't see this post)...  Now on to the winners!!

A Boatload of Winners:
Guest Designer at "Her Craftiness"Giveaway
Congrats to SueNJ of Susana's Scrappin' Corner for winning her choice of a pre-made journal or supplies to make her own!!
Operation Owl: Thank You, Kristal Blog Hop
Congrats to Kristen of Kris's Craft Coop !! She won a pack of Card-Making supplies!! YAY, Kristen!!

"Let's Get Cricky" Run For The Fallen Blog Hop
Congrats to Jill of Crafty Creations by Jill !! She won a pack of Card-Making supplies!! Woot-woot!!
And due to my own oversight of having already chosen a winner for this hop (whoops!!)...
Congrats to Kristan of Baby Cakes who will ALSO be receiving a pack of Card-Making supplies!!  Way to go, Kristan!!  :)


Jazzy's Christmas In July Blog Hop
Congrats to Pendra of Pendra's Place!!  Pendra will be receiving some Christmas Card Goodies (perfect to use with her newly won Cricut machine)!! :) YAY, Pendra!! :)

Memories In Time Christmas In July 4-day Blog Hop
Congrats to AmyJRockstar of Scrapping, Card-Making, and Living with Fibro!!  Amy has won a pack of Christmas Card-Making supplies!!  Woot-Woot!!  :)

Given the number of people who returned for EACH day of the Christmas In July 4-day Blog Hop, I decided to pick one RAK Winner from each day's comments (RAK = Random Act of Kindness).  This is just a small gift as my way of saying "Thank You" for your continued visits and comments -- It truly brightens my day to see each of you here!! :)  If you haven't stopped over to print the Explosion Box instructions (from the Day 1 post), please feel free to do so today (clicking on each picture will take you to that day's post)...

Christmas In July-Day 1 (Explosion Box instructions)
Congrats to our Day 1 RAK winner:  Sherrie from Sherrie Scraps with Passion

Christmas In July - Day 2
Congrats to our Day 2 RAK winner:  Judy -- she doesn't have a blog, but she's comment #3

Christmas In July - Day 3
Congrats to our Day 3 RAK winner:  Vicki from Maw Maw's Thoughts

Christmas In July - Day 4
Congrats to our Day 4 RAK winner:  Bunnyfreak from Everything Digital Scrapbook Layouts

A Mini-Giveaway Announcement:
If you aren't a winner, but want a guaranteed goodie, please click on the picture to find out how YOU can receive one of my handmade rosettes with stick pins!! :)

Current Love To Crop! Giveaway!
Spread a little joy, get a free rosette! :)

Whew!!  If you are a winner, PLEASE email me at scrapbookingwithamy at gmail dot com with your mailing address within 7 days to claim your prize!!  It is especially helpful to me when you include what your prize is and why you won it (hop name, RAK, etc.)...  Thank you so much!! :)

 And an Invitation:


How Neat Is That

This Saturday, you are invited to join me for a SUPER NEAT Blog Hop!!  A talented group of Bloggie-Land friends will each be showing you a NEAT project!!  Let me warn you, it doesn't have anything to do with organization (different kind of 'neat'!!  LOL)...  But I guarantee you will find yourself saying...  "Wow...  How neat is THAT?!?"  From interactive scrapbook pages to unique cards and gift ideas, you'll want to bring your notebook along for this Hop as every project is a "must-see-must-make" idea!!  :)  As always, I'll have some Blog Candy up for grabs...  So let me know you're attending by leaving me a comment on THIS post for an EXTRA chance in the drawing!!   
And as an added BONUS...  If you share this invitation and your friend tells me she was invited by YOU, you'll be entered in a SEPARATE drawing for your choice of the project I am sharing on Saturday OR the supplies to make your own!! 
 So share a link on your blog, on facebook, or on Twitter inviting your friends to check the hop out -- Make sure they know to mention your name when they RSVP or attend...

Congrats again to all of my winners...  I hope to see you all on Saturday!!
Until next time,

Tuesday, July 26, 2011

Celebrate The Occasion: Challenge #23 -- Blue & White... What a Delight!! Plus a mini-giveaway!! :)

Yippee-Ki-Ay!!  It feels like forever since I could say "It's time for another challenge at Celebrate The Occasion!"  Okay, it really hasn't been forever, but it's been an extra week longer...  Know why???  Cuz last week, CTO announced the second term of the Design Team and we have SIXTEEN new designers!!  WOWZERS!!  I am so incredibly pleased that I was invited to stay on the team (as I just ADORE my CTO-Sisters!!), and I can't wait to learn more about the new DT members!!  I hope you'll hop, skip, and jump on over to Celebrate The Occasion, take a lookie-see around, and then take a moment to visit the new team!! :)  While you're over at CTO, be sure to link up YOUR project in this week's challenge: ANY occasion -- Must use Blue & White!! :)

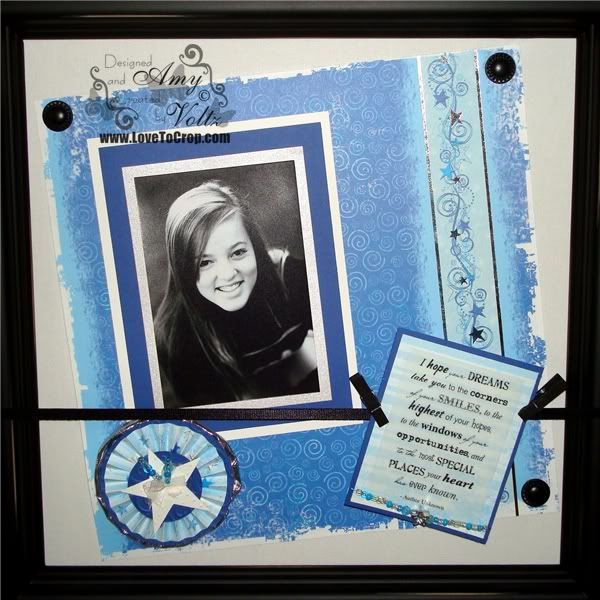
For my project, I decided to get started on decorations for The-Girl-Child's Graduation Party...  In our little town, it's nearly impossible to reserve a building, a basement, or even a table during June & July, so we decided to wait until August...  This worked out so well for The-Boy-Child's Grad Party last year AND it was a nice way to have a little 'send-off' for college...
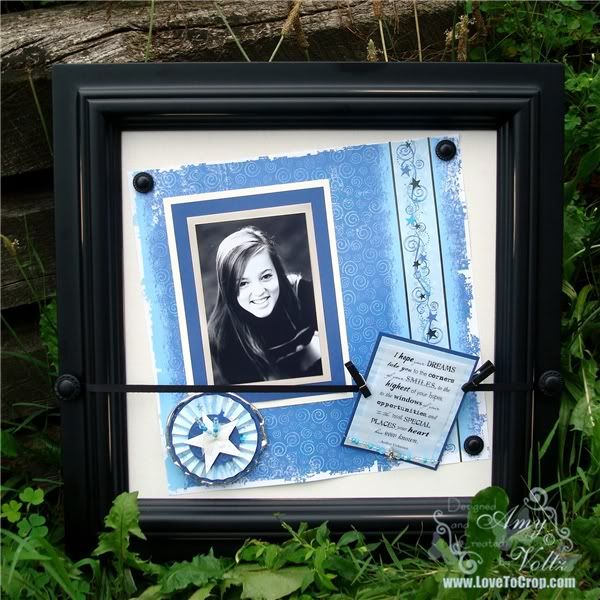
I started with an Everyday Display Frame from Creative Memories...  The backboard is magnetic so that you can quickly change the layout to match your mood, a theme, the season or holiday...  We have several of these displayed around our home -- It's fun to change them and see how long it takes before anyone notices (trust me, when it comes to pictures of themselves, they notice pretty quickly!!).
This is one of my very favorite pictures of The-Girl-Child...  That beautiful smile is something I look forward to seeing every day -- And I'm not quite sure how well I'll fare without it in a few short weeks!!  I triple matted this 4x6 photo on a silver 4.5x6.5 photo mat, a 5.5x7.5 blue photo mat, and a 6x8 white photo mat...  The variation in mat sizes is designed to draw your eye to the photo first, so if you have a 4x6 photo that you want to focus on, this is a quick tip you can try for great results!! :)
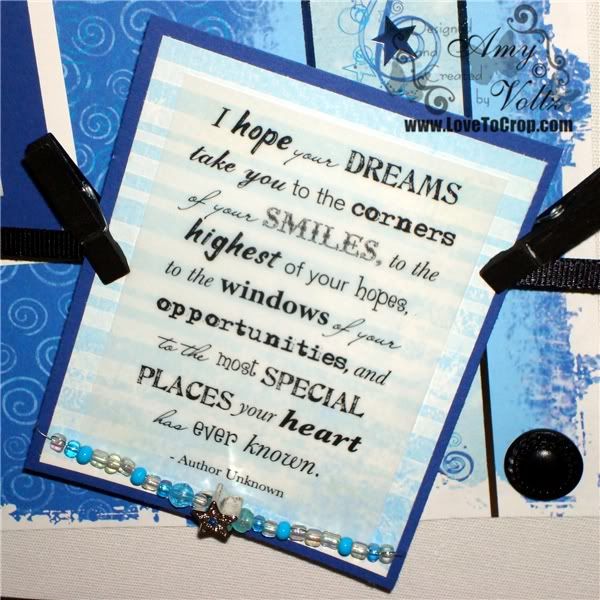
I absolutely LOVE this quote...  I strung the beads on thin wire and attached it to the bottom of the quote.  While this could easily be added to the layout when I transfer this to The-Girl-Child's album, I will probably create a journal and add this to the front of that instead (I can always add another copy of the quote -without the beads- to the layout, or I can simply add another photo or two -- the choice is up to me since this display board allows for me to move things around and change things up!!).
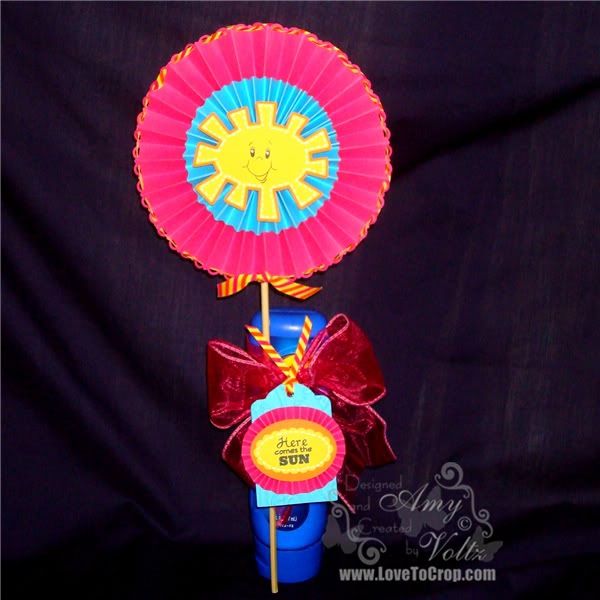
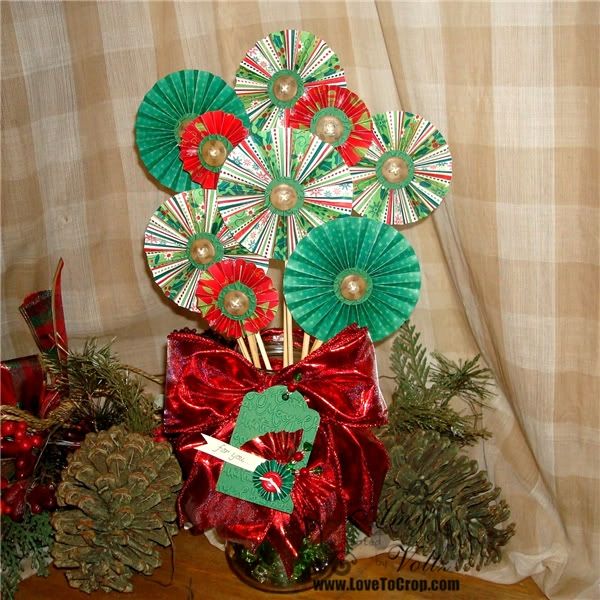
If you've been visiting me recently, then you know I'm all about the rosettes and handmade stick pins lately...  My bloggie-land friend, Carri, did a tutorial on these stick pins months ago (see it HERE), and I've had so much fun making them ever since (I'd love for you to hop over and see 
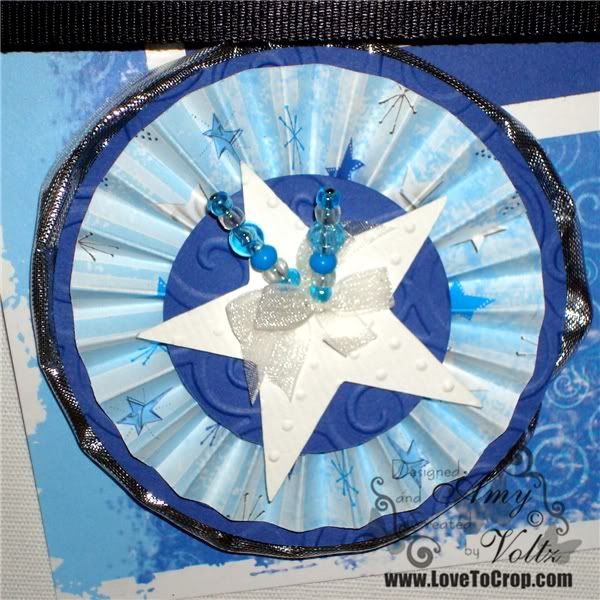
her video -- while you're there, please tell her I sent ya!!).  As for the rosette...  I started with a strip of decorative paper that measured 12" long and 1.5" wide.  I scored it every 1/4" and then 'fan-folded' it back and forth (a.k.a mountain/valley fold) before attaching the ends with strong adhesive (be sure not to twist it when attaching the ends).  As soon as you join the ends, it will look similar to a cupcake liner...  Have your liquid adhesive ready (a glue gun works even better if you can manage not to burn yourself while doing it -- ask me why I know to warn ya!) and press one edge out while pushing the other edge together and inward (basically, you're pressing it flat, but it needs a little help to squinch up in the center).  Now quickly glue the center and hold it in place until it is dry (see why the glue gun is faster?)...  Be careful not to glue your fingers to the rosette (ask me how I know, and, yes, I'm working on a photo tutorial, but I prefer not to have ALL of my fingers bandaged for it -- I draw the line at 3 band-aids).  Believe me, the more of these you make, the more fun they are and the easier they get!!  I added a 3.25" circle behind the rosette and a 1.5" circle to the front of the rosette (this helps cover up the glue too!).  I embossed each of these with Cuttlebug's D'Vine Swirls.  I then created a fabric circle from silver ribbon to go behind the rosette (2.5" wired ribbon -- gather the ribbon tightly on one side -- pulling the wire like a drawstring, then gently gather the other side slightly just so that it starts to roll on itself.  Join the edges of the ribbon together and try to create a seamless edge.).  The star is popped up on a foam square (I embossed it with Swiss Dots first).  Added my two handmade stick pins, and....
Voila!!  Done!! :)  Got the 'thumbs up' approval from The-Girl-Child, so I was a happy, happy mom...  While The-Turtle-Cat was slightly disappointed that we didn't get into the glitter, she was somewhat pleased when she discovered my bin of BEADS!!  Oh, yes, these are much more fun for chasing and playing (but they don't get stuck to her tail as glitter does -- And she really does like to pretend she's a fairy spreading fairy-dust when she swings her tail from side to side)...  Regardless, the beads are going under lock and key...  The-Turtle-Cat doesn't need to get creative with beads while I'm sleeping. :)

I hope you will join me over at  this week with your Blue & White Any Occasion project -- I'd sure LOVE to see what you create so click on the blinkie below to visit CTO and link up your project by Sunday night...


Now...  Would you like to receive one of my rosettes (complete with stick pins)?  All you have to do is a little bit of 'work'...  aka bloggie-love :)  Simply visit the CTO blog and find the list of NEW Design Team members (hint: they were ALL featured in last Tuesday's post)...  THEN, pick FIVE and go visit their blog...  Become a follower and leave them a comment letting them know that I sent ya...  As soon as you've done that, shoot me an email (scrapbookingwithamy at gmail dot com) telling me who you visited -- be sure to include your address so I can send you one of my rosettes -- the color will be a surprise, but if you like this one, I'm sure you'll like the one I send ya too!!  Be sure to do this quickly, as the offer (and the CTO challenge) is only open until SUNDAY, July 31st...

Thanks so much for stopping by, friends...  Until next time,
 
Blogging tips